How to enable channel 144
Cisco Solution
- Login to cisco controller

- Click on advanced tab

- Click on "BLANK" tab

- Choose Wireless > 802.11a/n/ac > RRM > DCA to open the DCA page
- Choose one of the following options from the Channel Assignment Method drop-down list to specify the Cisco WLC’s DCA mode:
-
Automatic—Causes the Cisco WLC to periodically evaluate and, if necessary, update the channel assignment for all joined access points. This is the default value.
-
Freeze—Causes the Cisco WLC to evaluate and update the channel assignment for all joined access points, if necessary, but only when you click Invoke Channel Update Once.
Note The Cisco WLC does not evaluate and update the channel assignment immediately after you click Invoke Channel Update Once. It waits for the next interval to elapse.
-
OFF—Turns off DCA and sets all access point radios to the first channel of the band, which is the default value. If you choose this option, you must manually assign channels on all radios.
Note For optimal performance, we recommend that you use the Automatic setting

-
- From the DCA Channel Sensitivity drop-down list, choose one of the following options to specify how sensitive the DCA algorithm is to environmental changes such as signal, load, noise, and interference when determining whether to change channels:
-
Low—The DCA algorithm is not particularly sensitive to environmental changes.
-
Medium—The DCA algorithm is moderately sensitive to environmental changes.
-
High—The DCA algorithm is highly sensitive to environmental changes.
The default value is Medium. The DCA sensitivity thresholds vary by radio band, as noted in the table below.
-
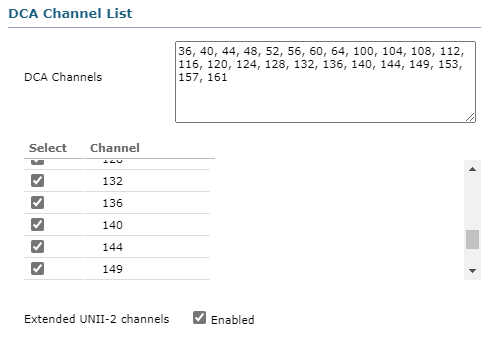
- Confirm you have channel 144 is selected in the DCA Channel List area

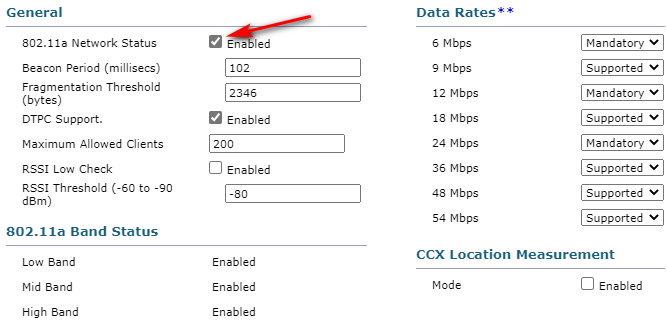
- Choose Wireless > 802.11a/n/ac > Network to open the Global Parameters page
- Select the 802.11a (or 802.11b/g) Network Status check box

- Click “Apply”

- Click "Save Configuration" to save changes to WLC

